ADD THE SLIDER CODE HERE

Showing posts with label upcycling. Show all posts

Thursday, June 20, 2019

re-fashioning a wide pant leg to a slimmer leg (shown on a jumpsuit)


It took me a reeeeaaaaaaalllllyyyy long time to warm up to jumpsuits. Well... that's not entirely true. I have always loved the look of military or work-wear type jumpers:

image 0
Rosie the Riveter anyone????

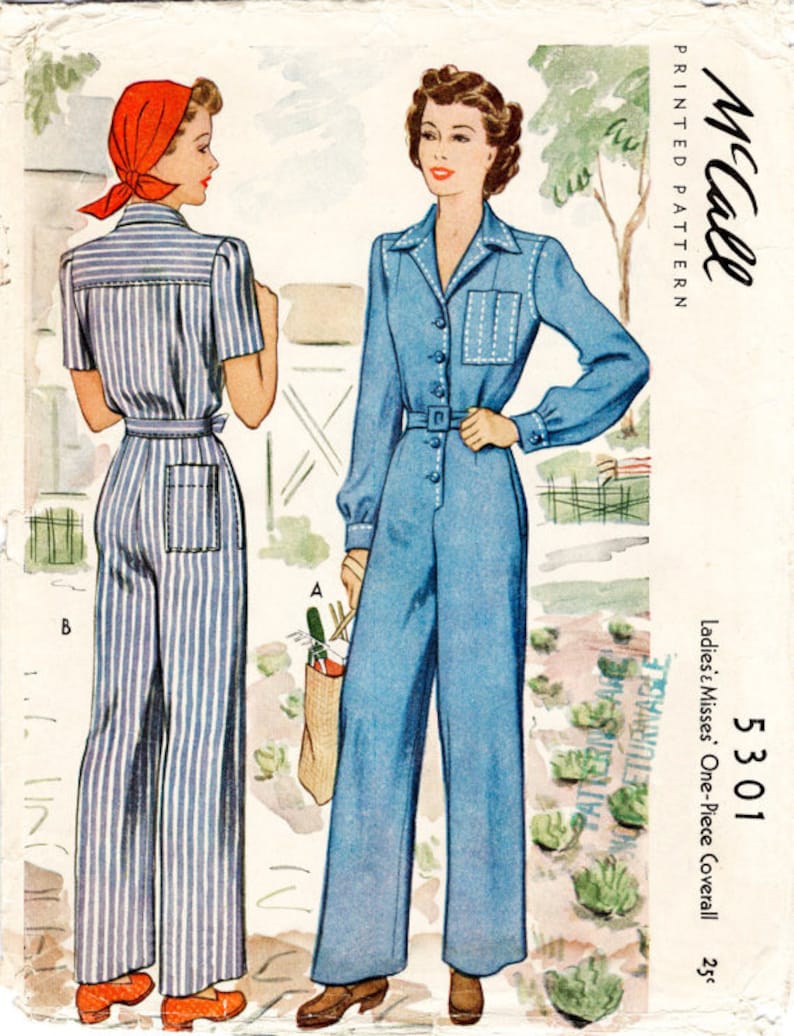
 but somehow can't seem to pull those off without looking like Mario or Luigi the plumber cousins (yes the Nintendo ones)...I basically was disgusted by the more feminine ones I kept seeing pop up, but then I saw these one day browsing some nerdy fashion history website:

Image result for vintage jumpsuit 40s 50s
Image result for vintage jumpsuit 1940s

and I started to change my mind. You see, the issue I think, is that all the modern jumpsuits I was seeing didn't have these amazing vintage silhouettes. The modern versions tend to have wide legs, which are actually also slowly growing on me, but unfortunately I don't feel like my body type is best complimented by those shapes.

SO. when I stumbled across a very inexpensive Target jumpsuit on a clearance rack in my size, with a floral print, colors , and buttons, I just couldn't pass it up. 


I mean...look at it!!!

I acknowledge my vertical challenged-ness, which once again, doesn't look all that great with this silhouette, and my little mind went to work thinking of how I could make my treasure even better, and look more like a vintage jumpsuit. 


I quickly realized it was all in the legs...this jumpsuit already had the upper silhouette of the 40s-50s ones I loved so much in the bodice, and I didn't want to mess with the buttons either. So I set out to work. 

At first I thought maybe I could just put elastic in the hems of the legs to make it tighter around my calves...I ended up just looking like an extra from Aladdin (yikes...) so I removed the elastics and went back to the drawing board.

After some serious racking in my brain I remember I had once taken in a pair of skinny jeans when I was in college, and vaguely remembered the process. I figured that really might work for the lower portion of this jumpsuit. After some trial and error, I got to work on taking in the legs of my jumpsuit. Below is a sketch of the process with numbered directions, keeping in mind, I am by no means an expert seamstress...this is perfect for the lazy and the beginner sewer :D


1. turn your pantalons of choice inside out

2. tear out the hems from the bottom

3. wear the pantalons inside out, and play around with the fabric to figure out how tight you want it, you definitely don't want to make it skin tight depending on your fabric content because your foot is still going to need to fit through the hem opening...once you have a good idea of what you want your new leg to look like, start pinning. Make sure you are pinching excess fabric and pinning on the INNER seam. Stop pinning when you reach the crotch seam. Don't mess with that...unless you want to do extra work later HA

4. remove the pants and get yourself some chalk in a color you can easily see against the fabric


5. chalk along the interior of the pins (between the pins and the original inner seam)

6. sew along your chalk line, removing pins as you go

7. try on your pants right side out, to see what the fit is like, you can go back and pick out seams and re-sew if stuff looks wonky at this point, but once you feel happy with the new fit...

8. turn the pants back to their inside out form, and cut off all the excess fabric on that original inner seam...unless you like the bunched up look and feel of all that extra fabric, then by all means skip this step :p

9. While in their inside out state, re-hem the pants. I'm ultra lazy and on my lightweight cotton jumpsuit saw no reason to actually sew the hem so I used heat n' bond hem tape and an iron lolz...but obviously you can sew the hems back on as well.

10. Enjoy your newly tapered pants!


PS: I used the excess fabric to make a long ribbon type thing...which could be worn as a waist tie or headband! I felt pretty clever


Hope you enjoyed this tutorial! How do you feel about wide leg jumpsuits? Do you feel like you might try to taper some pants with this method? Let me know in the comments :)

Merci 


Sunday, November 27, 2016

DIY: dyeing an old dress to make it new---BRICOLAGE: teindre une vieille robe pour la rendre neuve


This outfit has me feeling all sorts of holiday vibes...but it wouldn't have used to the way that I originally bought this dress.

I was making a random stop at a neighborhood Goodwill (can't remember the initial purpose of the visit). Then I spotted this very homely looking fabric poking out of the dresses "clearance" rack (the ones that have the colored tag for that day's promotion). I pulled on the potato colored material and out came this cutely shaped handmade vintage dress (I am guessing it is early to mid 1950s). The dress had clearly seen better days, there were parts that had a sort of oil based staining on it, and the seam where the zipper was sewn in needed some reinforcing. I took it to the dressing room and tried it on to make sure it would fit it. I basically fell in love (I mean for a few dollars what wasn't there to love) but immediately started brainstorming ways by which I could make it more wearable.

A packet of raspberry red dye, hot water, and a bathtub later I got a lovely new wardrobe staple!

A great way, in my opinion, to "save" or reuse something older that you might be tempted to overlook or toss out is to dye it. I have some tips on how to go about that below...


Here are some things to keep in mind when dyeing fabrics:

AGE: The age of any fabric will affect how well it takes to dye and how much it is at risk for deterioration. This dress is about 60 years old and the fabric is still in good shape, so I wasn't too concerned about its fragility. I have another dress from the 1920s which I have thought about dying but am still hesitating to do so because I worry about the age of the fabric. If you are looking into dyeing a garment any older than 50-60 years I would take some serious precautions and look into cold water dyes or non-acidic dyes which react a little differently and tend to be gentler on older fabrics. Tulip and RIT which are the two main brands found in the U.S are acidic dyes which should be used with caution on garments which are 70+ years old. You will probably have to go search online or to a specialty fabrics/dyeing store in order to get the appropriate dyes.

MATERIAL: Natural fabrics tend to take to dyes very well, so cottons, linens, hemp, bamboo and silks will usually turn out evenly dyed. Wool and cashmere are tricky because most dyes are heat activated and you will end up shrinking your fabric if you expose it to the temperatures required for most generic dyes. Synthetics are VERY unpredictable. While most synthetics CAN be dyed, you must do your research and make sure you don't set your expectations too high. Now the other thing is you need to be familiar with the look and feel of different materials because chances are, vintage and second-hand items will not have care and composition tags. This dress, as far as I can tell, is a cotton-linen blend. I knew it would be a fairly safe bet in terms of dyeing it to give it new life but I think a lot of it was luck and the fact that I was willing to take a risk because it was so inexpensive to begin with. 

EXISTING COLOR: Naturally, you can't buy a black dress, get a box of light blue RIT and dye it expecting a lovely sky blue result. If you have a dark item you want to take to a lighter shade, you will have to run an additional risk of bleaching the garment first, and then re-dyeing it. Additionally, unless your item is PURE white, do not expect the dye job to come out looking like the box or packet's description.  The theory of color and mixing does apply to dyeing clothing; a light green dress being dyed blue will yield a turquoise shade of sorts. Just be realistic in what your expectations are. The longer you dye the item, and the more dye you use, the higher concentration of pigment in your end result. 


EXISTING PATTERNS: Something a lot of people overlook is whether or not there are designs, pattern, or even stitching in a different color or material. I dyed another dress once and the stitching was a synthetic in pure white, and while it didn't end up being a big deal, the dress ended up being navy and the stitching stayed white. You need to take into account what features your item already has and decide what you are willing to live with in terms of changes to those details. 


EXISTING ISSUES: My dress had oily looking stains on it, this was something that I was hoping would be masked by a darker dye job and it was a risk I took, knowing full well the dye might cling to it and make it look even worse than before. Make sure you launder whatever item it is you plan to dye ahead of time to try and address any existing issues. If there are worn, frayed, areas or missing buttons decide whether or not you want to make the repairs with the existing colors or the ones of the new dye job. While dyeing can salvage a myriad of issues, sun fading and bleached spots are ones that can be unpredictable and difficult to fix. Make sure you understand the provenance of the damage and how they will react to dye. 
EXPERIENCE AND WILLINGNESS TO TAKE A RISK: No matter what, dyeing is a risky business. Keeping in mind I had already dyed quite a few things before attempting to dye this dress, I have repeatedly seen success using dyes in different projects and felt fairly confident I could get a favorable result. I was also very willing to take a risk what with the dress being so inexpensive. I figured if I did end up ruining it during the dyeing process that it would be sad but I could reuse the fabric as rags or something. You should probably pick a low-risk project as your first one to ensure you feel successful. 


Dyeing old clothes to give them new life can be rewarding and so fun! It can even give YOU life ;)

Friday, June 17, 2016

DIY shibori dyed t-shirt dress---bricolage robe t-shirt teinte shibori


I am getting super antsy for a trip my husband and I have planned for Japan. This Japan fire ignited the DIY I did a few days ago. 

I had this gray shirt dress in my closet that had been chilling there for a while and it was just a little too plain for my liking. I had acquired it at a local thrift store for a few dollars and had been itching for a way to make it my own because I loved the loose, flowy shape and drape (perfect for Houston summers to just throw on). 

I decided to dye it, shibori style, which is essentially Japanese tie-dye. Shibori uses a dark blue dye and knots and wooded boards and sticks to create a resistance pattern (the lighter sections). 

Je m' impatiente pour un voyage au Japon que mon mari et moi avons prévu. Cette impatience m'a inspiré et j'ai fait ce bricolage de shibori il y a quelque jours.

J'avais une robe-chemise grise qui était un peu trop ordinaire à mon goût. Je l'ai trouvé dans un magasin d'occasions et j'ai tout de suite apprécié sa forme détendue et sa souplesse (parfait pour la chaleur éttoufante de Houston en été). 

J'ai décidé de teindre la robe façon shibori, c'est à dire le teint est d'une couleur bleu foncé et l'imprimé est fait en formant des noeuds dans le tissu et en le nouant avec des cordes, des élastiques, et des morceaux de bois. 


you will need---vous aurez besoin de

  • an item you would like to dye, dye takes best to natural fabrics like cotton, silk, bamboo, rayon--- un article que vous aimeriez teindre, la teinture tiens mieux aux fibres naturelles comme le coton, la bamboo, le rayon, la soie etc
  • permanent fabric dye (I used the whole pack of blue and about 1/3 of the black, the blue I found was too bright for the look I was going for)---teinture de tissu permanente (je me suis servi d'un sachet entier de tienture bleu et 1/3 du sachet de teinture noir pour avoir la couleur bleu foncée que je voulais)
  • binding materials (rubber bands, wooden boards, craft sticks, rope, twine, you can get creative with this)---materiaux pour le nouage (élastiques, morceaux de bois, bâtonnets, corde, etc...vous pouvez vous servir de plein de choses pour votre imprimé)
  • 1/4 cup salt, 1 gallon of water---1/4 d'une tasse de sel, et 1 gallon d'eau
  • a container to stir the dye and your item in, possibly a stirring apparatus (a lot of people are able to use their kitchen sink, mine had dishes in it, lol, so I used a plastic tub)--- un récipient pour mélanger la teinture et l'article que vous allez teindre, il vous faudra aussi quelque chose pour remuer le tout (souvent les gens se servent de leur evier, le mien était remplie de vaisselle sale hihi, donc j'ai du utilisé une cuvette en plastique)


the steps---les étapes
  • get your water and salt cooking on the stove---chauffez votre eau et votre sel
  • to get the pattern I wanted I decided to make large knots in the corners and edges of the dress---pour faire l'imprimé que je voulais j'ai décidé de faire de gros noeuds dans les coins et les bords de la robe
  • I bunched up the middle part of the dress and bound it with some rubber bands, shibori makes use of accordion pleating and wooden boards and sticks too, you can research more patterns online---j'ai retroussé le milieu de la robe et je l'ai noué avec des élastiques, le shibori peut se faire avec des morceaux de bois et d'autres materiaux pour réaliser l'imprimé, ainsi que certain plis spéciaux


  • once water is steaming hot (not quite boiling) mix in the dye---une fois que l'eau émet de la vapeur melangez la teinture
  • stir in the tied up fabric you are dying, let it soak about 8-10 minutes before flipping the whole item over---trempez l'article que vous allez teindre et laissez le absorbez  la teinture en remuant au moins 8-10 minutes avant de le retourner sur lui même 
  • wait another 8-10 minutes while stirring around and making sure the dye reaches all visible parts of the fabric---attendez 8-10 minutes de plus en continuant de remuer 
  • at this point I actually took my dress out of the dye, but you can wait longer (about 40 more minutes) and the color will come out deeper and richer, I wanted mine to have a faded look---c'est à ce moment-ci que j'ai sorti la robe, vous pouvez laissez tremper l'article jusqu'à 40 minutes de plus si vous voulez une couleur plus riche et vive, je voulais un look un peu délavé 


  • take your item to another sink area or a bathtub/shower area (this gets a little messy and you may want to wear gloves)---transportez l'article à un autre evier ou bien une baignoire ou le sol d'une douche (cette étape peut être salissante, il serait judicieux de porter des gants) 
  • rinse and wring your item out with cold water for 10-15 minutes, do not unbind it yet---rincez et essorez l'article encore noué avec de l'eau froide pendant 10-15 minutes
  • once very little to no dye is coming out of the item you can unbind it and set it to dry---une fois que très peu de teinture coule du garment vous pouvez le dénouer et le mettre à sécher


Enjoy! Profitez!

If you want to see more DIY tutorials please let me know in the comments section, or if they are not your thing also let me know ;)

Si vous voulez voir plus de tutos bricolages faites-moi savoir dans les commentaires, si ce n'est pas votre truc préféré laissez-moi savoir aussi ;) 

Friday, April 22, 2016

embroidering today for a better tomorrow, an Earth Day DIY---broder aujourd'hui pour mieux vivre demain, un bricolage pour le jour de la Terre


Happy Earth Day! I just want to say having witnessed the power of Mother Nature this week in its full force (check out the flooding we had in Houston, TX) I am still in awe of how small we as humans are, but what an impact we can have too...I wish that Houston were more environmentally friendly and conscious and maybe catastrophic events like this can help people realize that it is not OK to litter the bayous and waterways to the point where they clog easily and overflow when a storm comes (I am aware there is more at play than that but I have lived a lot of places and Houston takes the cake for most overall polluted).

Joyeux jour de la Terre! Cette semaine j'ai été impressionné encore une fois par la puissance de Mère Nature (Houston, TX a souffert des inondations assez importantes). Cela me fascine à quel point les êtres humains sont petits, mais d'un autre côté nous avons une grande influence sur l'environnement...j'aimerais que Houston prenne conscience de ce fait et que la ville soit plus écologique, j'espère que les évènements de cette semaine montrerons aux gens que la pollution (surtout des bayouts et autres petits canals) n'aide pas la situation quand il pleu des cordes et que les passages d'eau sont bloquées. 


Anyways, descending from soapbox now and bringing you a tutorial that has helped me help the planet. A few years ago I was going through clothes I wanted to get rid of but felt bad about wasting when I saw how much was about to be thrown out/donated/sold. I thought of how I could transform the articles of clothing in a way that would make them appealing for me to wear them again. My main complaint is that they were too plain for my current tastes, so I thought about what I liked. I LOVE embroidered details and quickly set out to see how I could add this little pizzazz to my boring snoring shirts in an easy and inexpensive way. 

Bref, je me calme, et je vous apporte un tuto bricolage qui m'a aidé à sauver la planète (bon j'exaggere...). Il y a quelques années je faisais le tri de vêtements chez moi et le nombres de choses dont je me débarasser me faisait mal au coeur. Je me suis donc décidée à ne pas gaspiller et de faire un projet pour rendre mes chemises que je trouvais trop simple un peu plus intéressantes. J'adore les détails brodés et je me suis lancée dans un projet bricolage pour embellir mes chemises d'une manière simple et économe. 


You will need:


  • embroidery hoop (pictured in shots 5,6,8 this one was very inexpensive and I get a lot of use out of it)
  • embroidery floss in colors of your choice and darning needle or other large-eyed needle ( shot 7)
  • transfer/tracing paper (shots 1,2)
  • pencil with soft lead (6B is a good lead for this, pictured in shot 3)
  • good quality eraser
  • sewing pen/marker with water soluble ink (very inexpensive and easy to find, I also get a lot of use out of it, seen in shot 3)
  • scissors
  • a plain article of clothing of your choice :)


Vous aurez besoin de:

  • cercle à broder 
  • fil à broder et aiguille à broder 
  • papier calque 
  • crayon gras 
  • gomme 
  • feutre de couture
  • ciseaux
  • un vêtement simple de votre choix


1


You will probably want to decide on your design's size and location on the clothing first, make sure that if there are seams or pockets or buttons etc...you take that into consideration before starting. Also, if your fabric is dark consider investing in a white soft lead pencil so it appears on the fabric
.
 You can find ideas for designs  to embroider anywhere on the web, some are free templates some are not, so do be conscious of that. I got a lot of my ideas from my brain but you can find some neat ones here

Start sketching your design (or copying if you're getting it from the web) on the tracing paper with your soft lead pencil. Make sure the lead is nice and thickly spread on the design. 

Vous allez vouloir vérifier que votre dessin ne passe pas sur des coutures ou des boutons, poches, etc...et si votre matière pout le vêtement est de couleur sombre assurez vous d'avoir un crayon gras blanc. 

Si vous ne pouvez pas inventer votre propre dessin, il y a des modèles en ligne, certain sont gratuits et d'autres payants. J'en ai trouvé beaucoup ici mais vous pouvez faire vos propres recherches. 

Commencez à dessiner ou bien recopier votre dessin sur le papier calque. Assurez-vous que le crayon gras et beaucoup de depots sur le papier car celui-ci va être reproduit sur le tissue de votre vêtement.


 2

When you are done tracing it on the tracing paper and going over it with the pencil, lay it with the side you were just sketching on face down ON the fabric you are going to be embroidering (the extra graphite will be transferring the design).

Start gently rubbing and rolling the pencil sideways over the design to apply pressure and allow the extra graphite to transfer.  

Quand vous avez terminé votre dessin, mettez le papier calque à l'envers sur le vêtement à l'endroit où vous le voulez. Commencez à frottez doucement avec le côté du crayon pour faire le transfert du calque à la matière. 

 3

If you mess up in the tracing or transferring stage you should still be able to erase your marks and recover the project ;) except yours Gretchen, yours is a lost cause...bahaha just kidding I don't even know a Gretchen, sorry if a Gretchen reads this and gets offended. 

The transfer will be light but should be visible enough for you to then retrace it with the sewing marker. The sewing marker basically erases off of fabric with water, I promise it WILL go away once you wash the project. 

Retracez les marques de crayon avec votre feutre de couture, malgré ça couleur vive, l'encre disparaitra une fois qu'elle sera lavée.

 4

 5

Phew, you have traced this design so many times by now you will be able to embroider it with your eyes closed. Now for those amateurs who need to keep reading this is for you. 
Make sure when you buy your embroidery hoop that it is large enough to suit the majority of your project needs, you may like this enough to keep doing it and may want to do bigger designs down the line... 
You will need to stretch the fabric pretty tight, but not so tight that it compromises the threads and may lead to breakage of the pattern and fabric later; I find it easiest to kind of set the back hoop on the inside of the fabric and adjust the top part that I can see and basically mess with it until I get it to be easy for me to manage as I work on it.

Maintenant que vous avez retracez ce dessin autant de fois vous pouvez le broder avec les yeux fermés. Ok tuto terminé hahaha. 
Achetez un cercle à broder assez grand pour votre dessin. Étendez le tissue des deux côtés avec le bas du cercle en premier (je trouve que le cercle du haut et plus facile à manipuler) mais assurez vous que le tissue ne soit pas trop tendu autrement il sera fragile quand vous allez commencez à passer l'aiguille et le fil autour du dessin. 


 6


You are now ready for the embroidery floss and the darning needle. You need a needle with a larger eye because unless you plan on stitching your project with sewing thread, passing the floss through a sewing needle's eye will be quite challenging.

Il faut du fil et une aiguille spécial pour faire le brodage, une aiguille avec un trou assez large pour laisser passer le fil qui est plus épais que du fil à coudre.

 7

Make a knot in your embroidery floss and start working on your design from the back. You can look here for different stitches to use and practice them on other fabric if you'd like. I kind of just go for a fill in the space look hahaha, though I did show two different kinds of that look (I wouldn't normally do that, just trying to show some options). Once you are done with part of your design (to start a different part like a different flower, or if you want a different color) make sure to tie down the thread on the back of the fabric. 

Faites un noeud dans votre fil et commencez à faire le tour de votre dessin. Si vous voulez des coutures spéciales vous pouvez en trouver ici, moi personnellement je fais un peu comme un coloriage, je reste entre les lignes hahahaha. Une fois que vous avez fini une partie (soit vous changer de couleur ou bien un motif différent) du dessin faites un noeud dans le dos du tissue et recommencez. 

 8


I am not done with the one from the tutorial, I was actually planning on dying the fabric so that will be part of another tutorial :) but here is the finished design on one of my other blouses.

Je n'ai pas encore fini le dessin de l'autre tuto, mais je voulais teindre la chemise d'une autre couleur donc ça devra attendre et j'en ferai un autre tuto à l'avenir :) voici un ancien dessin que j'ai realisé il y a un certain temps.


two of my finished products (all original designs)
 This pink button-down was a gift from a friend, it was purchased from H&M originally. The white button-down was a hand-me-down from my mom.

sassy because all my stuff is thrifted/recycled
White corduroy jeggings from thredUP, originally GAP; $11 (they were also featured here)
Vintage shoes from Vinted: $18

and saving the planet makes me happy