ADD THE SLIDER CODE HERE

Showing posts with label vintage style. Show all posts

Thursday, June 20, 2019

re-fashioning a wide pant leg to a slimmer leg (shown on a jumpsuit)


It took me a reeeeaaaaaaalllllyyyy long time to warm up to jumpsuits. Well... that's not entirely true. I have always loved the look of military or work-wear type jumpers:

image 0
Rosie the Riveter anyone????

 but somehow can't seem to pull those off without looking like Mario or Luigi the plumber cousins (yes the Nintendo ones)...I basically was disgusted by the more feminine ones I kept seeing pop up, but then I saw these one day browsing some nerdy fashion history website:
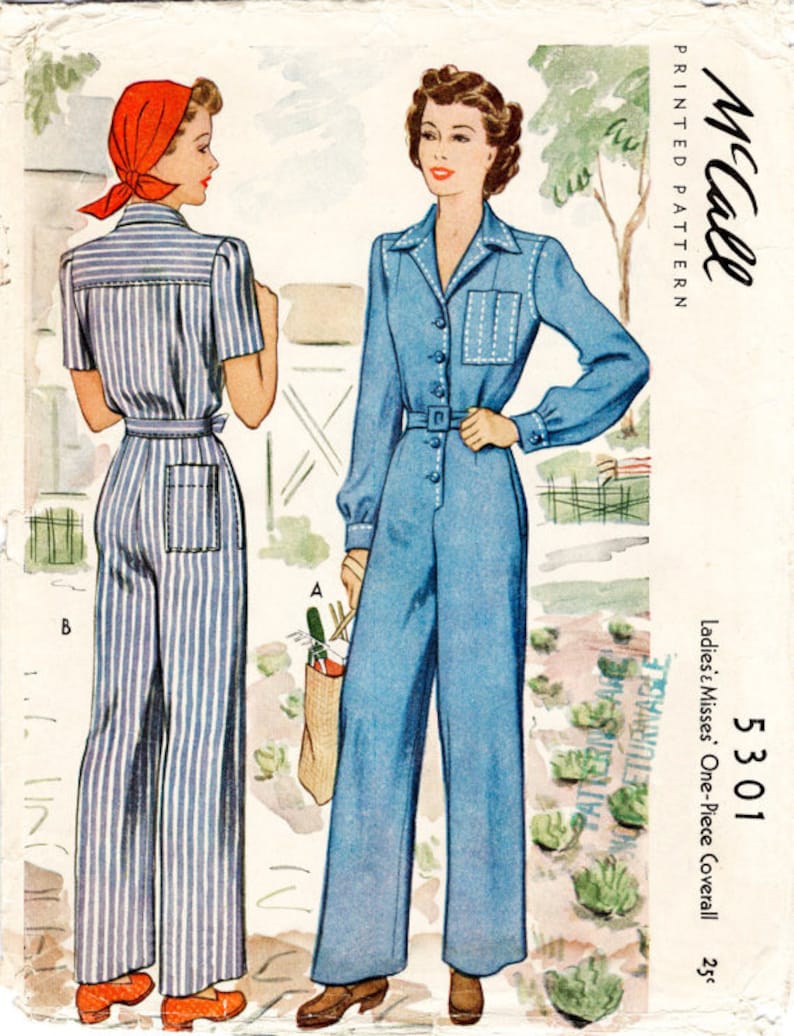
Image result for vintage jumpsuit 40s 50s
Image result for vintage jumpsuit 1940s

and I started to change my mind. You see, the issue I think, is that all the modern jumpsuits I was seeing didn't have these amazing vintage silhouettes. The modern versions tend to have wide legs, which are actually also slowly growing on me, but unfortunately I don't feel like my body type is best complimented by those shapes.

SO. when I stumbled across a very inexpensive Target jumpsuit on a clearance rack in my size, with a floral print, colors , and buttons, I just couldn't pass it up. 


I mean...look at it!!!

I acknowledge my vertical challenged-ness, which once again, doesn't look all that great with this silhouette, and my little mind went to work thinking of how I could make my treasure even better, and look more like a vintage jumpsuit. 


I quickly realized it was all in the legs...this jumpsuit already had the upper silhouette of the 40s-50s ones I loved so much in the bodice, and I didn't want to mess with the buttons either. So I set out to work. 

At first I thought maybe I could just put elastic in the hems of the legs to make it tighter around my calves...I ended up just looking like an extra from Aladdin (yikes...) so I removed the elastics and went back to the drawing board.

After some serious racking in my brain I remember I had once taken in a pair of skinny jeans when I was in college, and vaguely remembered the process. I figured that really might work for the lower portion of this jumpsuit. After some trial and error, I got to work on taking in the legs of my jumpsuit. Below is a sketch of the process with numbered directions, keeping in mind, I am by no means an expert seamstress...this is perfect for the lazy and the beginner sewer :D


1. turn your pantalons of choice inside out

2. tear out the hems from the bottom

3. wear the pantalons inside out, and play around with the fabric to figure out how tight you want it, you definitely don't want to make it skin tight depending on your fabric content because your foot is still going to need to fit through the hem opening...once you have a good idea of what you want your new leg to look like, start pinning. Make sure you are pinching excess fabric and pinning on the INNER seam. Stop pinning when you reach the crotch seam. Don't mess with that...unless you want to do extra work later HA

4. remove the pants and get yourself some chalk in a color you can easily see against the fabric


5. chalk along the interior of the pins (between the pins and the original inner seam)

6. sew along your chalk line, removing pins as you go

7. try on your pants right side out, to see what the fit is like, you can go back and pick out seams and re-sew if stuff looks wonky at this point, but once you feel happy with the new fit...

8. turn the pants back to their inside out form, and cut off all the excess fabric on that original inner seam...unless you like the bunched up look and feel of all that extra fabric, then by all means skip this step :p

9. While in their inside out state, re-hem the pants. I'm ultra lazy and on my lightweight cotton jumpsuit saw no reason to actually sew the hem so I used heat n' bond hem tape and an iron lolz...but obviously you can sew the hems back on as well.

10. Enjoy your newly tapered pants!


PS: I used the excess fabric to make a long ribbon type thing...which could be worn as a waist tie or headband! I felt pretty clever


Hope you enjoyed this tutorial! How do you feel about wide leg jumpsuits? Do you feel like you might try to taper some pants with this method? Let me know in the comments :)

Merci 


Monday, June 17, 2019

styling hacks for when you don't feel like going sleeveless


Picture this: you've got a tank or sleeveless dress that is begging to be worn...and you can't quite bring yourself to wear it as-is. There are many reasons why you might not want to go sleeveless this summer. Maybe the weather in your neck of the woods really isn't all that summery (side eye at Texas...), maybe you just don't like to bare your shoulders, maybe the occasion calls for more modesty, maybe you got a bad sunburn or other injury you want to conceal...my personal reasons are religious but I realize that doesn't necessarily apply to everyone so here is a quick little styling guide on how to transform that sleeveless stunner into one with a little more coverage. 


Between the pictures of me awkwardly walking away on train tracks are the 5 key things to consider when styling sleeveless to go sleeve-ful (? lol)

similar dress/similar blouse/similar shoes


Over/Under


 Silhouette


Color


Print


Style


I ranked the categories in what I consider, order of importance. Let's dive in...

Over/Under

This is honestly a personal preference...I think in a majority of cases you can't really go wrong with layering something over your main item. It just tends to look better in most cases, simply because there are so many choices ...cardigans, blazers, jackets, boleros, button down shirts, shawls, you get the picture. Layering under can prove to be a little trickier, but can be very cute when done correctly. The key I think is to consider the other factors when making your decision.

*as a general rule I don't recommend putting plain t-shirts under things, it harks back to the early 2000's styles for me and most sleeveless things deserve something a little nicer to elevate the style when adding coverage*

Silhouette

Consider the following when thinking of how to alter your dress or tank or whatever sleeveless item...
Some consider a cap-sleeve to be sleeveless, there are flutter sleeve/pinafore type sleeveless, there are spaghetti straps all the way to muscle-tank type straps.

 Next, the shape and length of the item. Is the dress flared? Fitted? Loose? Does it have buttons or a tie waist? Where is the waist? How long is the dress? These are all things to take into account because that will determine what type of coverage to add. For instance, I wouldn't put a blouse under a cap sleeve or thicker tank sleeve; too much bulk and similarity in cut of the sleeves.  


With the cherry dress, it has an adorable bustier top, and a nipped in waist with a tie back that leads to a flared skirt. I didn't want to interfere with or hide those features with either way I styled it.  I could have just as easily paired it with a cropped jean jacket or biker jacket if I wanted to add a bit of an edge to the outfit, but I chose to go with "period" appropriate layering pieces. The cherry print dress is very retro, 40s-50s, and so I chose a vintage velvet bolero in a coordinating green hue below, and a vintage reproduction silky blouse to go under the dress above. 
similar bolero (this is a one-of-a-kind vintage item)


I'm going to lump together color and print between the two sleeveless dresses I chose to feature. Colors of items should coordinate (they don't necessarily have to match). Beyond pulling inspiration from the existing colors of the main item it is usually safe to pair neutrals as your layering pieces, while considering the tones of the sleeveless item: cool tones will look better with navy and grey pairing items, warm tones with browns and tans, white and black tend to go with nearly everything. 

If the print is already loud on your main item, try to tone down the print you mix it with, small prints very neutral colors like tiny polka dots, or stripes, or keep it solid. And vice versa, if your main item is solid or subtly printed, go a little bolder with your color or print. 

I had two pretty bold prints and color palettes to start with. Hence me sticking to solid colored items... 

similar dress/espadrille wedges/similar shawl

Style

 The last thing to consider is the style you're going for. Like I mentioned earlier, the cherry dress could have been paired with so many options, but I chose to go full retro, because that was my mood that day. The second dress is much more casual and bohemian. Which is why I went a little more boho casual with the styling. I'm all for mixing styles however, and there is absolutely nothing wrong with pairing ultra-sweet feminine dresses with tough leather jackets, or super structured dresses with flowy cardigans. 


The last styling tip I have is if you like a dress, but maybe not necessarily the top of the dress...or if you want to expand your wardrobe in ways you didn't think possible, look below. You can pull a closed or buttoning top over the top of the dress to disguise the top of the dress completely and make it look like  a top and skirt. Bada-boom new outfit! I recommend putting a belt with it too, to add structure to the whole thing and accentuate the waistline. 


olive green blouse/similar belt

Sunday, January 28, 2018

Covering the Basics with Cleo Madison---modest clothing options in a modern world


My first post of the year 2018 includes my review of an up and coming modest clothing company, Cleo Madison. I love everything that they stand for and can't wait to see more of their designs going forward. 


First of all, I appreciate that they picked the name of an Old Hollywood starlet turned director and producer as their namesake.  When I saw this midi length A-line skirt with a velvet burnout detail I got all the vintage vibes and had to snap it up. The light dusty blue color is just beautiful and also called me back to more glamorous times like Ms. Madison's.


Affordability is one of Cleo Madison's selling points, and affordable they are! I can happily say that even though their prices are very low, the quality of the skirt I got is exceptional. 


I found that the designs Cleo Madison offers are varied and can be dressed up or down, in fact I have worn this skirt in both more formal settings and casual ones as well. It is comfortable, versatile, and cute and I couldn't ask for much else in a wardrobe item. 


Sunday, November 19, 2017

Vintage Style Sunday: Olive green fall look


similar dress/similar shoes/similar hat/similar tights

It's been a really long time since I blogged. I am going to be honest, I really just wanted to quit. My husband has had two major surgeries for a torn Achilles tendon (with another surgery scheduled for a couple weeks from now). He tore his Achilles about a week after our disaster-riddled move to the Dallas area. That and both of us starting new jobs...it's just been one thing after another lately, but this blog is one of my ways of releasing some of that stress so I decided to jump back in and drag my poor husband out wearing his boot and toting the camera...he's a saint. 

similar dress/similar shoes/similar hat/similar tights
I will be starting a series where I feature vintage items from my wardrobe once a month with inspiration on how to incorporate pieces in a modern wardrobe. I fell in love with this olive green 1940s wool dress last year, I bought it, then remembered I lived in Houston; where there are literally no days in the year where it is comfortable to wear wool clothing. 

Today it was a beautiful fall day in Dallas, with a little chill and some wind. So I took this dress out for a spin for the first time!!! Some details I love are the flared skirt, slightly puffed sleeves, and the cute collar (concealed by my hair...ugh). 

similar dress/similar shoes/similar hat/similar tights 


 I paired it with some black oxford heels, which I believe should be a staple in every closet, they go with almost everything and add a touch of whimsy and class to any outfit. I also paired it with some fun polka dot tights and my vintage 1940s hat which I have featured on the blog before. My awesome sister-in-law got me the cute clock necklace at a maker fair in Oregon, it is pretty unique and this was the closest thing I could find that might be similar to it.


similar dress/similar shoes/similar hat/similar tights

The biggest thing I have learned when purchasing vintage is knowing your measurements and how you fit certain other clothes. I browsed many other olive green vintage dresses before coming across one that had measurements that would fit me comfortably. Some things to keep in mind is that slightly larger items can be easily tailored and/or might end up being more comfortable because they allow for movement, while items too small for you just won't do. Err on the side of slightly too big when you are making that judgment call. Don't purchase anything without knowing its measurements!!!

similar dress/similar shoes/similar hat/similar tights

I hope you all feel inspired to start delving into the world of vintage, it is a great way to add uniqueness to your wardrobe and be ecologically friendly as well. I will be providing more tips and tricks which I have discovered along the way as I continue this series. Do you have any vintage items in your wardrobe? If so, where did you get them? Let me know in the comments and have a great day :)

Saturday, June 24, 2017

Covering the basics with Unique Vintage---modest clothing options in a modern world

skirt/blouse/heels/purse/belt/crinoline

I'm back with another addition to my series on places where I find clothing with more coverage. One of my very favorite sites where I continually find beautiful modest clothes is Unique Vintage. I own MANY of their one piece swimsuits which I might feature here at some point, and the heels, skirt, and petticoat I am wearing in this shot are from there as well. 
skirt/blouse/heels/purse/belt/crinoline

Unique Vintage's pieces are a little spendier than what I am accustomed to paying for but they also run sales and deals and honestly, the quality of their pieces can't be beat. If you know anything about me you know I am a sucker for vintage and retro styles so the fact that they sell true vintage clothes and vintage recreated styles has me goo-goo, ga-ga and needing to exercise a lot of restraint so as to not buy everything.

skirt/blouse/heels/purse/belt/crinoline
Now I want to clarify some things about myself and this blog. I have titled this series about "modesty". I find that modesty is subjective and easily misinterpreted. So here are a few things to keep in mind...

1. My version of modesty looks different than it might yours. It might look different even than other women's in my own faith. Modesty to me, means I respect myself, God, and the promises I have made to Him. I dress in a way I would feel comfortable presenting myself to Him. That looks different on different days too, if I am going to church I am going to try and show respect by dressing a little nicer. If I am working out, I am just trying to be comfortable and functional to exercise and keep my body healthy. 

To some I dress in a way that might seem stuffy, old fashioned. I get that and respect it. 
And to others I might dress in a way that is totally scandalous. I get that and respect that too. 
skirt/blouse/heels/purse/belt/crinoline
2. Some people think modest dressing even goes beyond that to not dress in a way that brings any kind of attention to yourself and that style in and of itself cannot be "modest". Some people see it as being completely frugal with the money you spend, and to an extent I try to adhere to that with my wardrobe but it is all relative, and I am sure that to some of those people I am scandalous as well. But they probably wouldn't be reading a fashion blog...

skirt/blouse/heels/purse/belt/crinoline
3. Just because I choose to dress the way that I do does not mean I will judge ANYONE for their own choices to dress in as much or as little clothing as they want to. I also don't think that modesty should be about anyone other than YOU and YOUR choices. Whatever YOU are comfortable with does not have to be explained to anyone else. Everyone is responsible for their own thoughts and actions. The way you or I dress does not give anyone a right to say or do anything to degrade or humiliate us. That says more about the person making the comment or doing something rude than it does about you.

skirt/blouse/heels/purse/belt/crinoline

At the end of the day fashion makes me happy, and finding ways to be creative with it makes me happy. Finding great new places to shop, like Unique Vintage, makes me happy and I just want to share the happiness. 

:)

Tuesday, June 20, 2017

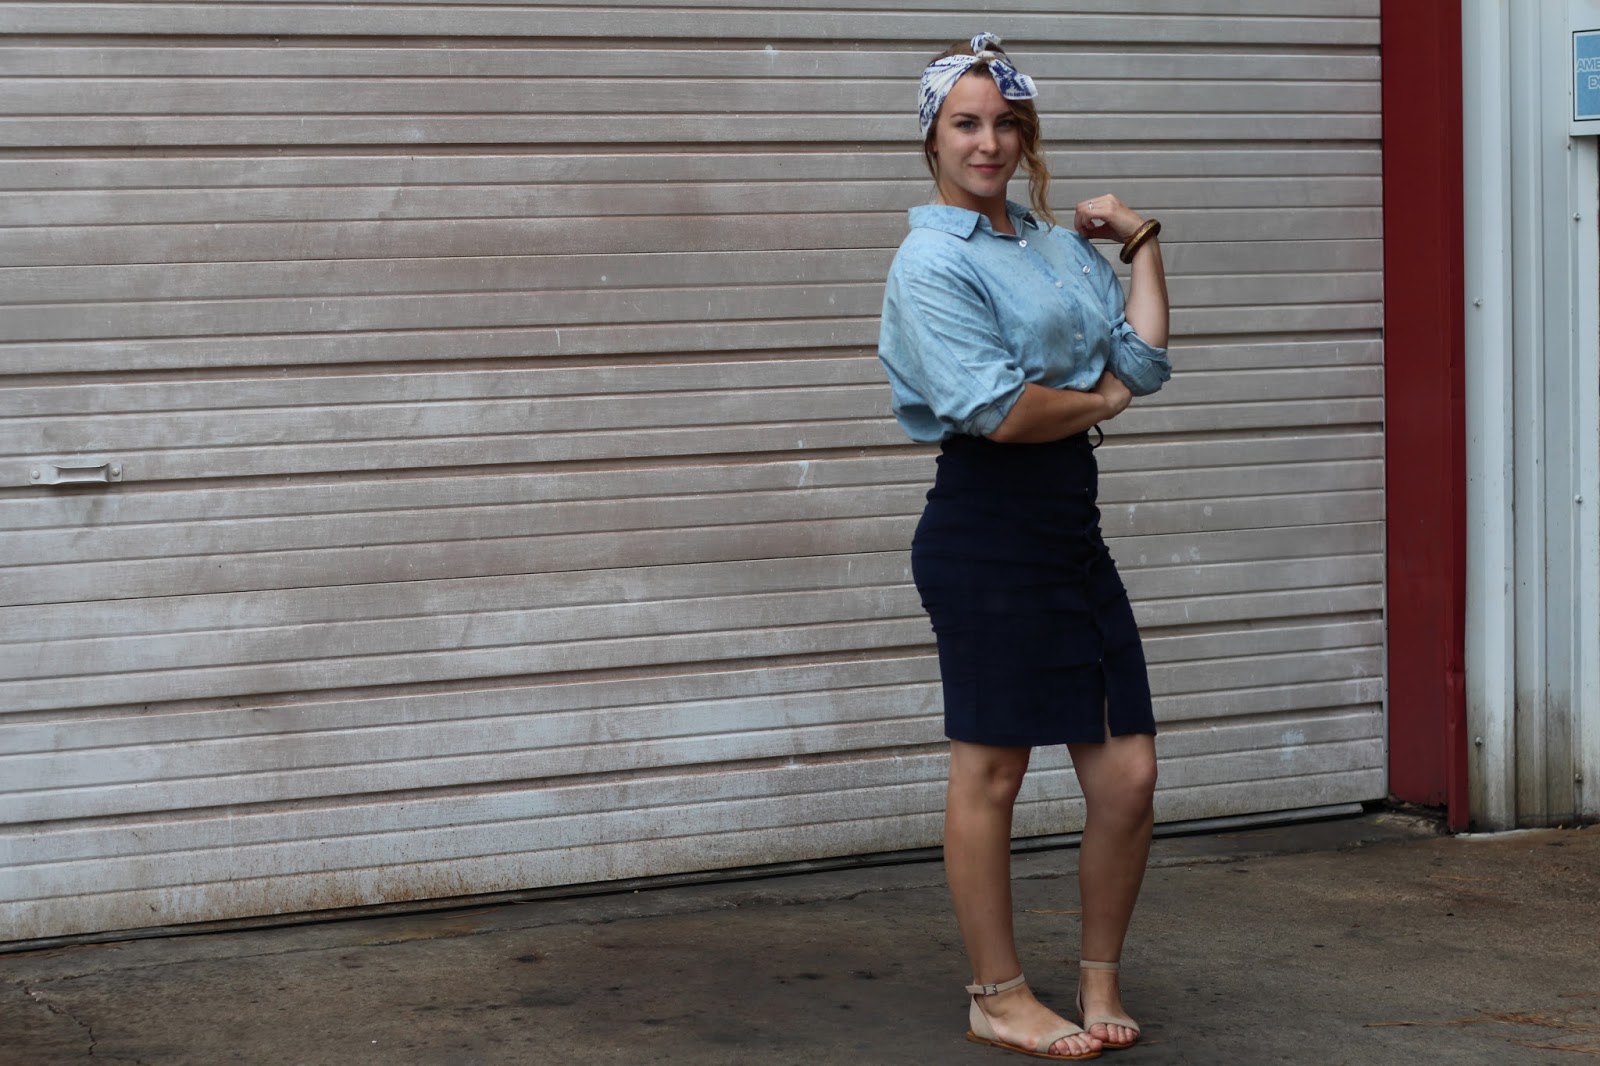
How to: rock all blue hues---Comment: porter plusieurs nuances de bleu


scarf/skirt/shirt/sandals

Monochrome looks are nothing new, but they are definitely not for the faint of heart. To get this styling challenge right, here are a few tips...

scarf/skirt/shirt/sandals

1. Make sure your hues are of similar warmth. We call this a color family. For instance, there are khaki greens vs. turquoise greens. One has a high concentration of cool tones (turquoise green) and the other is very very warm (khaki). My blues are in the same color family, they have concentrations of cool blues and grays.

scarf/skirt/shirt/sandals

2. Keep the accessories neutral. Unless your monochrome look is comprised of neutrals itself make sure the accessories are not a distraction to the rest of your color palette. I chose some simple nude sandals and one of my favorite wood bracelets inlaid with a band of antique gold. 

scarf/skirt/shirt/sandals

 3. Keep in mind the whole aesthetic of your look  when pulling pieces from your wardrobe. This whole outfit has a rustic, vintage vibe. I have other blue items but some of them are more modern or sleek looking; those wouldn't have fit with the look I was going for. You know yourselves and your wardrobes, maybe don't pair a super feminine blouse with frills with a pair of ahtleisure mesh and scuba leggings of the same hue. Or do, it might turn out fabulous!!!

scarf/skirt/shirt/sandals


Sunday, November 27, 2016

DIY: dyeing an old dress to make it new---BRICOLAGE: teindre une vieille robe pour la rendre neuve


This outfit has me feeling all sorts of holiday vibes...but it wouldn't have used to the way that I originally bought this dress.

I was making a random stop at a neighborhood Goodwill (can't remember the initial purpose of the visit). Then I spotted this very homely looking fabric poking out of the dresses "clearance" rack (the ones that have the colored tag for that day's promotion). I pulled on the potato colored material and out came this cutely shaped handmade vintage dress (I am guessing it is early to mid 1950s). The dress had clearly seen better days, there were parts that had a sort of oil based staining on it, and the seam where the zipper was sewn in needed some reinforcing. I took it to the dressing room and tried it on to make sure it would fit it. I basically fell in love (I mean for a few dollars what wasn't there to love) but immediately started brainstorming ways by which I could make it more wearable.

A packet of raspberry red dye, hot water, and a bathtub later I got a lovely new wardrobe staple!

A great way, in my opinion, to "save" or reuse something older that you might be tempted to overlook or toss out is to dye it. I have some tips on how to go about that below...


Here are some things to keep in mind when dyeing fabrics:

AGE: The age of any fabric will affect how well it takes to dye and how much it is at risk for deterioration. This dress is about 60 years old and the fabric is still in good shape, so I wasn't too concerned about its fragility. I have another dress from the 1920s which I have thought about dying but am still hesitating to do so because I worry about the age of the fabric. If you are looking into dyeing a garment any older than 50-60 years I would take some serious precautions and look into cold water dyes or non-acidic dyes which react a little differently and tend to be gentler on older fabrics. Tulip and RIT which are the two main brands found in the U.S are acidic dyes which should be used with caution on garments which are 70+ years old. You will probably have to go search online or to a specialty fabrics/dyeing store in order to get the appropriate dyes.

MATERIAL: Natural fabrics tend to take to dyes very well, so cottons, linens, hemp, bamboo and silks will usually turn out evenly dyed. Wool and cashmere are tricky because most dyes are heat activated and you will end up shrinking your fabric if you expose it to the temperatures required for most generic dyes. Synthetics are VERY unpredictable. While most synthetics CAN be dyed, you must do your research and make sure you don't set your expectations too high. Now the other thing is you need to be familiar with the look and feel of different materials because chances are, vintage and second-hand items will not have care and composition tags. This dress, as far as I can tell, is a cotton-linen blend. I knew it would be a fairly safe bet in terms of dyeing it to give it new life but I think a lot of it was luck and the fact that I was willing to take a risk because it was so inexpensive to begin with. 

EXISTING COLOR: Naturally, you can't buy a black dress, get a box of light blue RIT and dye it expecting a lovely sky blue result. If you have a dark item you want to take to a lighter shade, you will have to run an additional risk of bleaching the garment first, and then re-dyeing it. Additionally, unless your item is PURE white, do not expect the dye job to come out looking like the box or packet's description.  The theory of color and mixing does apply to dyeing clothing; a light green dress being dyed blue will yield a turquoise shade of sorts. Just be realistic in what your expectations are. The longer you dye the item, and the more dye you use, the higher concentration of pigment in your end result. 


EXISTING PATTERNS: Something a lot of people overlook is whether or not there are designs, pattern, or even stitching in a different color or material. I dyed another dress once and the stitching was a synthetic in pure white, and while it didn't end up being a big deal, the dress ended up being navy and the stitching stayed white. You need to take into account what features your item already has and decide what you are willing to live with in terms of changes to those details. 


EXISTING ISSUES: My dress had oily looking stains on it, this was something that I was hoping would be masked by a darker dye job and it was a risk I took, knowing full well the dye might cling to it and make it look even worse than before. Make sure you launder whatever item it is you plan to dye ahead of time to try and address any existing issues. If there are worn, frayed, areas or missing buttons decide whether or not you want to make the repairs with the existing colors or the ones of the new dye job. While dyeing can salvage a myriad of issues, sun fading and bleached spots are ones that can be unpredictable and difficult to fix. Make sure you understand the provenance of the damage and how they will react to dye. 
EXPERIENCE AND WILLINGNESS TO TAKE A RISK: No matter what, dyeing is a risky business. Keeping in mind I had already dyed quite a few things before attempting to dye this dress, I have repeatedly seen success using dyes in different projects and felt fairly confident I could get a favorable result. I was also very willing to take a risk what with the dress being so inexpensive. I figured if I did end up ruining it during the dyeing process that it would be sad but I could reuse the fabric as rags or something. You should probably pick a low-risk project as your first one to ensure you feel successful. 


Dyeing old clothes to give them new life can be rewarding and so fun! It can even give YOU life ;)